 |
|||||||||||||||||||||||||||||||||||||||||||||
 |
|||||||||||||||||||||||||||||||||||||||||||||
| Costumes | |||||||||||||||||||||||||||||||||||||||||||||
|
|
|||||||||||||||||||||||||||||||||||||||||||||
| Tips and Tricks for Costuming.
Circle Skirts You will need basic sewing skills and an understanding of sewing terms. No patterns are offered, just simple instructions for basic costume wardrobe items. These are just guidelines offered and nothing is set in stone. Practice on inexpensive fabric to get the fit right before you cut into anything expensive. Of course the item can be as basic or as fancy as you want or need based on your fabric selection and the amount of embellishing you do. Special thanks to those who helped to create and proof these tips. |
|||||||||||||||||||||||||||||||||||||||||||||
|
|
|||||||||||||||||||||||||||||||||||||||||||||
| Circle Skirts
You don't need a pattern to make a circle skirt, just a simple compass and your measurements to make a basic circle panel. Circle panels can make several different types of dance skirts, but they all start out the same way. Variations of circle skirts can be as diverse as 1950's poodle skirts to really full gypsy skirts, and panel skirts. Basic circle: 1 full circle (2 half panels) Gypsy skirt: 2 or more full circles Panel skirt: half circle for front, and full circle for back Flounces and ruffles can be added for extra detail. Because you will need to "hang out the bias" (allow the fabric to stretch), you will want to start making this skirt at least a week prior to the date you plan to wear it. INSTRUCTIONS: The amount of yardage you will need is based on how full of a skirt you are planning, and your height. You will need a length twice measurement A and at least as wide as measurement A for one half-circle panel. MEASUREMENT A MEASUREMENT B Measurement A less B is C (you will need this). To make a simple compass using a string the length of A, attach a push pin to one end and tailor's (fabric) chalk to the other. Fold fabric in half; To hang out the bias Put whatever type of waist band in you prefer (casing and elastic work well), and hem. Hemming can be done several ways, here are 2 that work well: |
|||||||||||||||||||||||||||||||||||||||||||||
 |
|||||||||||||||||||||||||||||||||||||||||||||
|
|
|||||||||||||||||||||||||||||||||||||||||||||
| Pantaloons
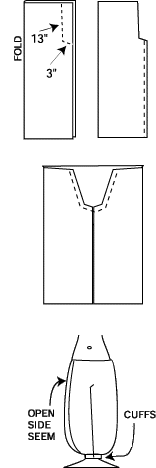
Basic pantaloons require about 2.125 to 2.25 yards of 45" wide fabric depending on your height and how "poofy" you like the lower leg of the pantaloons to be. Just remember its easy to trip over pantaloons that are too long. Cut the fabric in half length wise, place wrong sides together and fold inhalf length wise. Along the selvage edge (not the fold) cut out the crotch area: a strip of fabric 12" to 15" long and 2" to 3" deep. (To get your crotch depth sit on a hard chair and measure from your hip--where you'd wear the pantaloons--to the surface of the chair add 4" that will give you extra for ease and elastic casing.) Sew each leg into a tube along selvage (don't sew crotch shut!). Place one tube inside the other right sides together matching center seams and along the crotch cutout. Sew legs together along crotch. Fold over top and make elastic casing, insert elastic. 2 Quick Modifications 1) Use the left over fabric from crotch cut out to make ankle cuffs. You will want to shorted the length of the pant leg a few inches (from 3" to 5"). 2) Cut the crotch out along fold edge. Don't sew pant legs into tubes, just pin them and sew pantaloons together. Unpin selvage edge and decorate. You'll end up with open seamed pantaloons. |
|||||||||||||||||||||||||||||||||||||||||||||
 |
|||||||||||||||||||||||||||||||||||||||||||||
|
|
|||||||||||||||||||||||||||||||||||||||||||||
| Simple Belts
This is a nice easy, quick, and elegant belt to make. You need: a length of 1" cotton belt webbing long enough for your hips plus a bit of overlap, heavy duty coat hooks (2), fringe the same length as the belt webbing, and assorted decorations (nice trim, or some sequins , or small appliqués, or nothing at all) Sew the fringe to the webbing, fold under the ends of the webbing and attach the coat hooks. Decorate. You'll want the belt to fit comfortably, yet snug enough to stay put while dancing. Special thanks to Cristobal. |
|||||||||||||||||||||||||||||||||||||||||||||
|
|
|||||||||||||||||||||||||||||||||||||||||||||
| Body Stockings
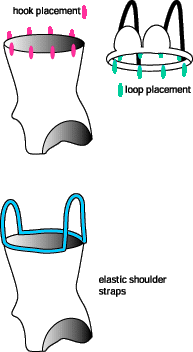
If you wear a leotard style net body stocking (like a leotard with the top cut off) there are several ways you can attach it to your costume. Sew strategically placed hooks facing away from your body along the top edge of the stocking. Sew corresponding eyes/loops to your dance bra. Sew eighth inch elastic along the top edge of stocking at center front, loop up to make shoulderbands and sew elastic at center back. Use flesh toned elastic (or costume specific colored elastic) and tuck under your bra straps. |
|||||||||||||||||||||||||||||||||||||||||||||
 |
|||||||||||||||||||||||||||||||||||||||||||||
|
|
|||||||||||||||||||||||||||||||||||||||||||||
| Keeping your belt on
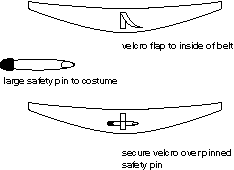
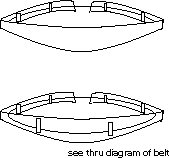
Two functional ways to keep your belt on while you do your best to dance it off. One way sew velcro flaps to the inside of your belt (at least one to the front and one to the back)-sew half of the velcro securely to the belt, and flap the other half on top. If your belt is just a tad too big, and moving the hooks a quarter of an inch just isnt worth it-try putting a belt inside your belt. Sew several belt loops to the inside of your costume belt, wide enough to accomodate belt webbing. Get enough belt webbing and buckle to have a firmly fitted belt. Run the webbing belt thru the belt loops in your costume belt. The webbing belt will cinch in the costume belt just enough, and help hold it up to boot. |
|||||||||||||||||||||||||||||||||||||||||||||
 |
|||||||||||||||||||||||||||||||||||||||||||||
 |
|||||||||||||||||||||||||||||||||||||||||||||
|
|||||||||||||||||||||||||||||||||||||||||||||
